![EduMe_primary_full_colour_light_bg_RGB.svg]](https://help.edume.com/hubfs/EduMe_primary_full_colour_light_bg_RGB.svg)
Watch a 1-min demo of Checklists
What's covered in this article
- What are Checklists?
- Creating a new Checklist
- Adding and editing Checklist items
- Setting Checklist visibility
- Publishing your Checklist
- Where users and managers see Checklists
- Evidence capture
- Coming soon
🤔 Not sure if Checklists are available to you? Ask your CSM if this is included in your current product package.
What are Checklists?
Checklists allow admins to build structured, step-by-step task lists for their teams to follow. They're designed to support and check-off real-world procedures and processes - things like an opening-shift routine, a new-starter setup list, or a compliance walk-through - rather than to teach new knowledge the way a course or guide would.
A Checklist sits alongside other content types like Courses and Guides. Admins can create and edit checklists, add items, reorder them, and delete checklists that are no longer needed. Each checklist item can be marked as required or optional, and visibility can be controlled at the team level so the right people see the right checklist.
Once published, users see any checklists visible to them in a dedicated Checklist listing, and managers get a single view of completion status in the Performance Dashboard - making it easy to confirm who has followed the process and who hasn't.
Best practice
To get the most out of Checklists:
- Keep each checklist focused on a single routine or procedure.
- Write item titles as clear, actionable tasks (e.g. “Count the till float”, not “Till”).
- Use the description field for extra detail so the title itself stays short.
- Only mark items as required if they're essential to completing the process.
- Set visibility to the specific team(s) the checklist applies to, rather than everyone.
Creating a new Checklist
- Navigate to the Learning tab in the admin panel.
- Select the Checklists tab, alongside Courses & Guides, In Person Assessments, SCORM, Live Sessions, and Paths.
- Click Create in the top right corner.
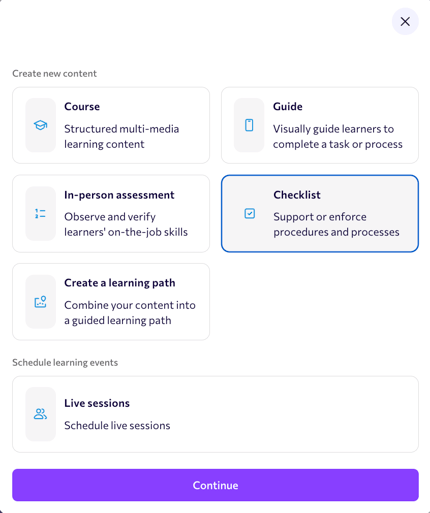
- In the “Create new content” window, select the Checklist tile (“Support or enforce procedures and processes”).
- Click Continue. A new, untitled checklist opens in the editor.
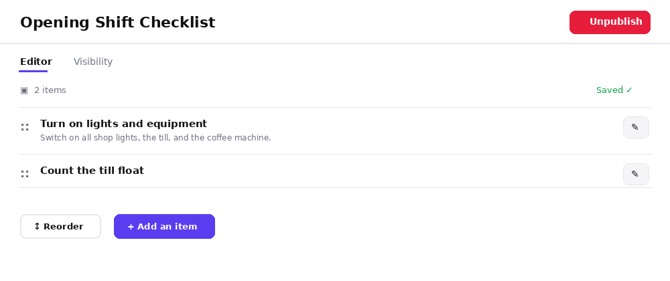
Click the checklist title at the top of the page (it starts as “Untitled checklist”), type a clear, descriptive name - for example, “Opening Shift Checklist” - and click the checkmark to save it.
Adding and editing Checklist items
Each item represents a single task or step the user needs to complete.
- Click + Add an item.
- Enter a Title for the task - this is what the user sees as the checklist step.
- Optionally, add a Description with more detail or instructions.
- Use the “Is required?” toggle to set whether the item must be completed for the checklist to count as done (defaults to Yes).
- Click the checkmark to save. Items save automatically as you go - you'll see a “Saved” confirmation next to the item count.
- Repeat with + Add an item for each additional step.
To edit an existing item, click the pencil icon next to it to change its title, description, or required status.
Reordering Checklist items
- Drag and drop: use the handle (::) to the left of an item to drag it into a new position.
- Reorder button: click Reorder at the bottom of the item list for a dedicated reordering view.
Setting Checklist visibility
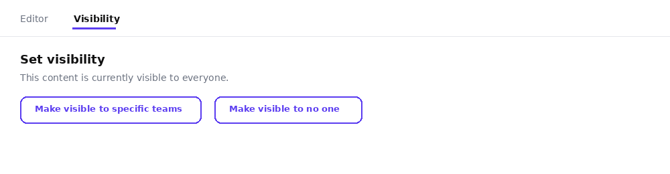
- Click the Visibility tab at the top of the editor.
- By default, new content is visible to everyone in the group.
- To restrict visibility, click Make visible to specific teams, select the relevant team(s), and click Update visibility.
- To hide the checklist from everyone — for example, while it's still being built — click Make visible to no one.
Publishing your Checklist
- Once the content and visibility are set, click Publish in the top right corner.
- The status changes to Published, and the button changes to Unpublish — click this at any time to take the checklist offline again without deleting it.
💡 A checklist can be published and unpublished as many times as needed. Unpublishing keeps all items and settings intact. It only removes the checklist from users' view.
Where users and managers see Checklists
- Users: published checklists that are visible to them appear in a dedicated Checklist listing under the Learning tab, alongside other content types.
- Managers/Admins: checklist completion status is surfaced in the Performance Dashboard, giving a single view of who has completed what.
Evidence Capture
Checklists give your frontline clear, actionable steps to follow. Now, you can go one step further and verify those steps were completed to standard.
With Evidence Capture, you can require photo or text proof for individual checklist tasks. Your frontline can then upload evidence to show each task was completed correctly.
To require evidence for a checklist task:
- Open your checklist and select the task you want to require evidence for.
- Add a photo requirement if you want frontline workers to upload a photo showing the task has been completed.
- Add a text requirement if you want frontline workers to provide written confirmation or details about how they completed the task.
- Publish your checklist. When completing the task, frontline workers will be prompted to provide the required evidence before submitting their checklist.
- View submitted evidence once the checklist is complete to see the photos or text uploaded for each task.
Coming soon...
-
Reminder notifications
-
Direct assignment to individual users
-
Detailed submission-level reporting