Creating and Managing Knowledge Hubs
Build a content hub for your learners to access training whenever it's needed
📣 Admins now have access to more flexible content curation and sharing through Knowledge Hubs via our newly released content visibility rules which will be rolled out to all customers. If you are an existing Knowledge Hubs user and would like to learn more, please reach out to your Customer Success Manager and read about how these Knowledge Hubs visibility rules can benefit you!
What's Covered?
Sharing your Knowledge Hub with learners
How to customise the look and feel of your Knowledge Hub
☝ Note: Knowledge Hubs replace Seamless Dashboards. If you’re using a Seamless Dashboard and want to find out how you can move to a Knowledge Hub, reach out to your Customer Success Manager.
What are Knowledge Hubs?
Knowledge Hubs are collections of training content you create that learners can access and revisit. You can share them via your preferred distribution method, or embed them into your app/relevant access point.
Content can be categorised and assigned using Sections to help learners easily find the training that’s most relevant to them.
How to create a Knowledge Hub
Prerequisites:
- You have created your team(s)
Creating a new Knowledge Hub
- Navigate to the Learning tab
- Click on Knowledge Hub from the left side panel under the heading Curation
- You will have one section created by default which you can start adding content to right away
- To create additional sections, click on + Add new section, give it a name and click Create section
- To add content to your Section, click on the Section you'd like to add to, then click on the + in the course/Guide tile, or drag and drop the course into the Section
- To remove a course/Guide, click on the x within the course tile or drag it back to the righthand side content menu
- Content can be reordered by dragging the content tile and dropping into your preferred order
- You can preview how content will appear in your Knowledge Hub by clicking Preview Knowledge Hub in the top right corner
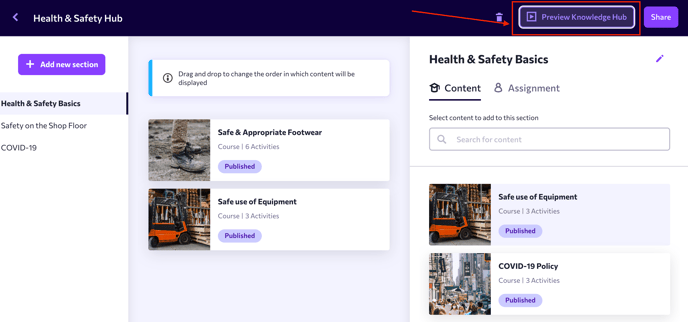
- To ensure learners can easily navigate through content in their Knowledge Hub, Sections with more than 2 courses/Guides will display tiles with horizontal scroll, while Sections with up to two courses will be displayed in a list
- To ensure learners can easily navigate through content in their Knowledge Hub, Sections with more than 2 courses/Guides will display tiles with horizontal scroll, while Sections with up to two courses will be displayed in a list
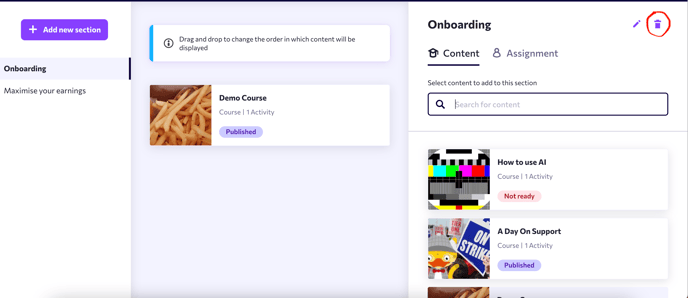
- If you would like to delete a section, you can do so by clicking on the trash can icon in the top right corner of the editor in the specific section you'd like to delete.
Assigning Sections to teams
Knowledge Hub content is assigned to teams via each Section. You can assign a Section to one or multiple teams. Only the team(s) you select will see that Section in their Knowledge Hub.
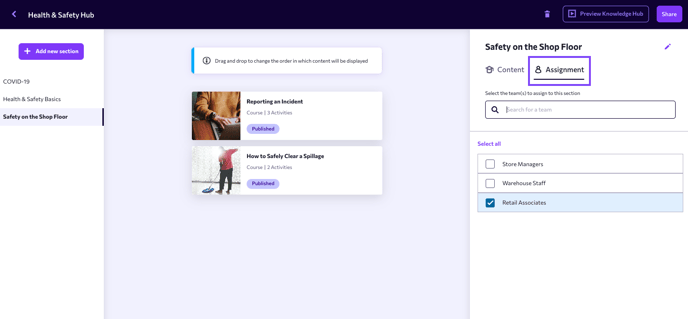
To assign a Section to a team, select the Section you’d like to assign from the lefthand menu.
Click Assignment in the righthand editor panel and search for or select the teams you’d like to assign the Section to.
Sharing your Knowledge Hub with learners
Once you have created your Knowledge Hub, you can choose how you’d like to share it with your learners, depending on your preferred delivery method and user setup. We recommend either of the following options:
Option 1: I want to add learners to eduMe teams when they access the Knowledge Hub
Choose this method if your learners don't already exist in eduMe / in a team, and you want them to self-enrol via the Knowledge Hub link you share.
Available authentication methods:
- Seamless links
- Self-sign up links
- SSO links
Note: Each of these links require a team. Read our support articles on Seamless links and SSO links for more information
Recommended set up:
- When you want to generate your link, click Share
- Toggle Yes to the question 'If a user accessing this link is not assigned to any of the teams within the KH would you like us to assign them?'
- Select the team(s) you'd like to assign to the Knowledge Hub
- Copy your preferred link
Outcome:
You'll share one link with all learners. All learners will see the same content
Tip: It's also possible to assign different Sections to different teams using this method, however you will need to generate and manage multiple links for each team. We recommend an approach that only requires one link for simpler management
Option 2: My learners already exist in eduMe within teams
Choose this method if your learners already exist in eduMe / in a team.
Available authentication methods:
- Seamless links
- Self-sign up links
- SSO links
Note: You don't need any team ID when generating these links; we can recognise which team(s) learners are part of from their unique identifier
Recommended set up:
When assigning Sections, you can assign different teams to each Section
Outcome:
You'll share one link with all learners. Learners will see different content that's relevant to their team
How to customise the look and feel of your Knowledge Hub
Remember! Knowledge Hubs are customised on a group level. Before making changes to your Knowledge Hub branding, check you have the correct group selected
Note: Knowledge Hubs customisations can be accessed by Company and Group Leads
Knowledge Hubs make use of branding set up in company or group branding settings. If you haven’t already, you can add your logos and colours here.
Here you will be able to configure your Knowledge Hub with your desired colours, style and layout that will be visible to your learners.
-
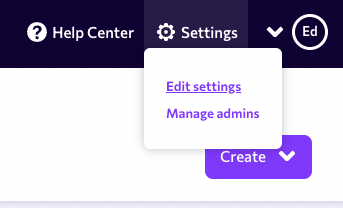
Click Settings from the top navigation bar and select Edit settings
-
Under Branding Settings, select Knowledge Hub

-
In the righthand panel, select Customised under Select a Layout. You can see a preview of how your Knowledge Hub will appear in the center window
-
First select a header colour and text colour from the options you have set within the Group and Company logos & colours sections
-
Choose a name for your Knowledge Hub to be displayed to your learners. This name will appear for any Knowledge Hub you create
-
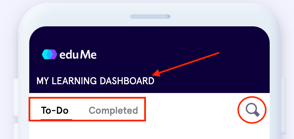
Organise courses in “To-Do” and “Completed” tabs, using the On/ Off toggle
-
“Search” On/ Off toggle - allows learners to search for courses
-
Sort your content by last published or alphabetically by course title
-
Edit course card options including: on/off for no. of activities, on/off for for course time estimate, border radius settings and progress bar colour

Customise as desired…
-
FAQs
Q: If I assign a team to my Knowledge Hub, will any other content that team has previously been assigned appear in the Knowledge Hub, too?
A: No, only the content you choose to add to the Knowledge Hub will be displayed.